There’s a special feeling the first time you point your vehicle toward a high risk or PDS tornado watch—the map bleeding red, SPC wording going bold, mesoscale discussions scrolling like coded warnings from another planet.
The First Day You Roll Toward a Red Box
Excitement, anxiety, and the hum of possibility.
If this is your first season chasing, your biggest vulnerability isn’t the storm. It’s what you don’t know about your own gear—what you need, what you don’t, how to use it at highway speeds under a rotating sky.
This is a step-by-step weather gear playbook built specifically for first-time storm chasers, grounded in meteorology and hard-earned field lessons.
Step 1: Pre-Day Gear Check with Meteorological Context
Before you lay out a single cable, answer one question: What kind of day is this?
1. Read the SPC Outlook and Soundings First
Look for:
- Storm mode expectations: discrete supercells vs. lines vs. messy clusters.
- Forcing mechanisms: dryline, warm front, triple point, outflow boundary.
- Key parameters: CAPE, shear, SRH, LCL heights.
Gear implication:
- Discrete supercells with high shear and low LCLs = prioritize radar, navigation, and safety gear for close intercepts.
- Linear systems (QLCS) = prioritize navigation, lightning safety, and wide-view cameras.
Now that you know what the atmosphere intends, you can build your gear layout to match.
Step 2: Build Your Minimum Viable Chase Rig
Forget fully tricked-out chase vehicles. You can safely chase with a compact setup—if you prioritize right.
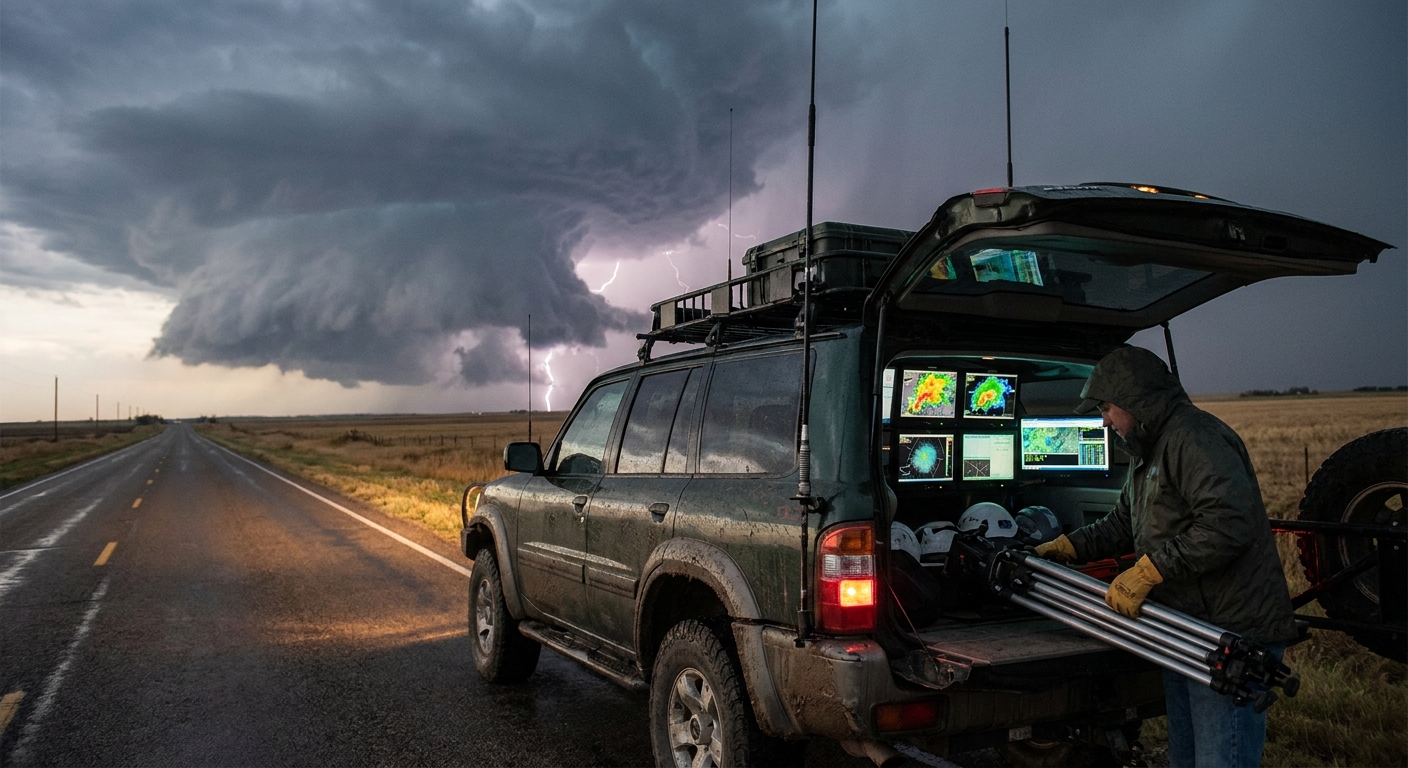
1. The Core Tech Stack
You need:
- Smartphone with:
- Radar app (at least base reflectivity and velocity).
- Navigation app with offline maps.
- SPC, NWS, and local media alerts enabled.
- Secondary display (ideally):
- Tablet or laptop on a secure mount.
- Radar software with multi-tilt and GPS overlay.
- Power:
- 12V chargers and at least one power bank.
Playbook rule: If your radar and navigation both die, you end the chase. No argument.
2. Positioning Gear
Add:
- Standalone or in-device GPS with your position visible on radar.
- Paper maps for key chase states.
Your job is to never be uncertain about where you are relative to the hook, forward flank, and inflow notch.
Step 3: Safety Gear Before "Fun" Gear
You are not storm-proof. Respect that from day one.
1. In-Vehicle Safety
Mandatory:
- Seatbelts for everyone at all times (no exceptions for filming).
- Seatbelt cutter + window punch within reach of driver.
- ABC fire extinguisher.
Highly recommended:
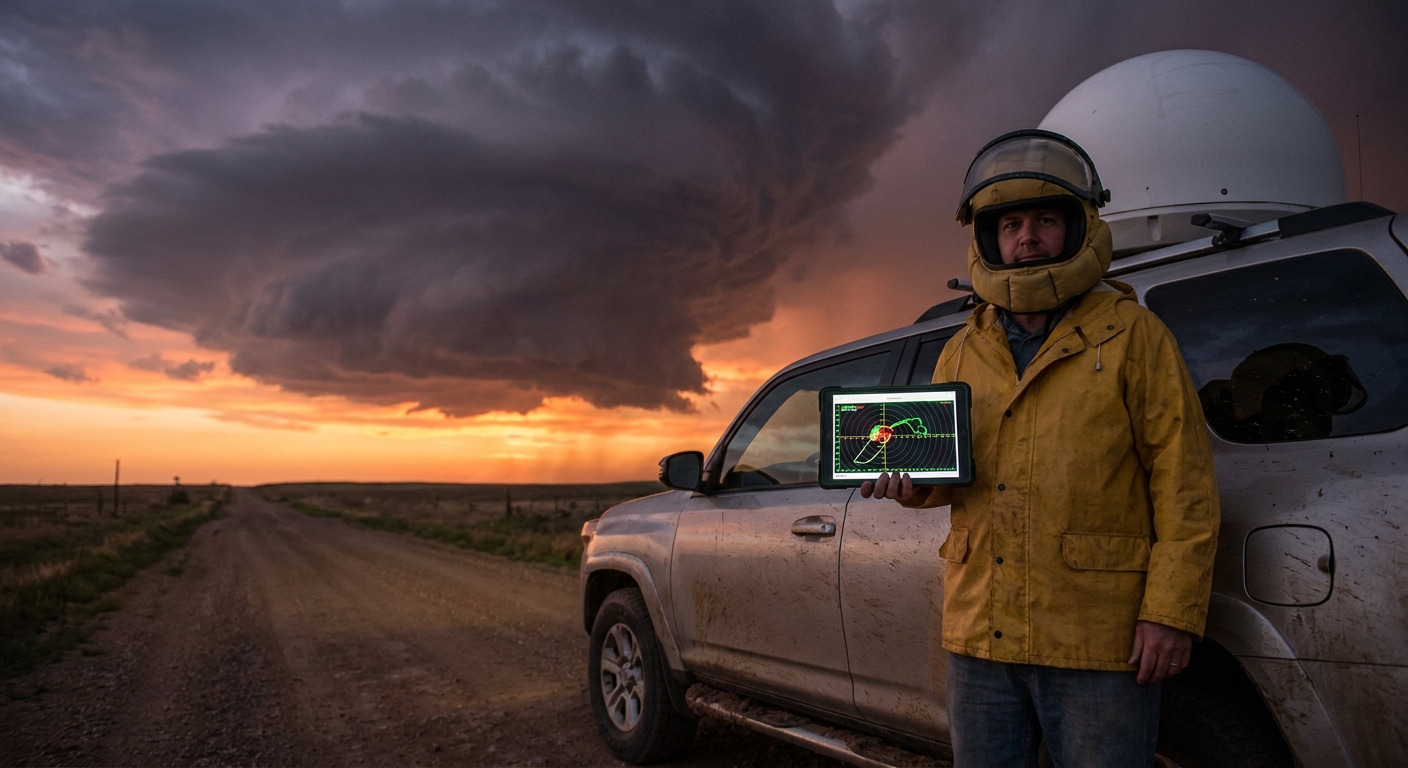
- Helmets (for hail and crash protection).
- Safety glasses.
Imagine a panic jam at a four-way stop as a circulation approaches. You may not cause the accident—but you will still be in it.
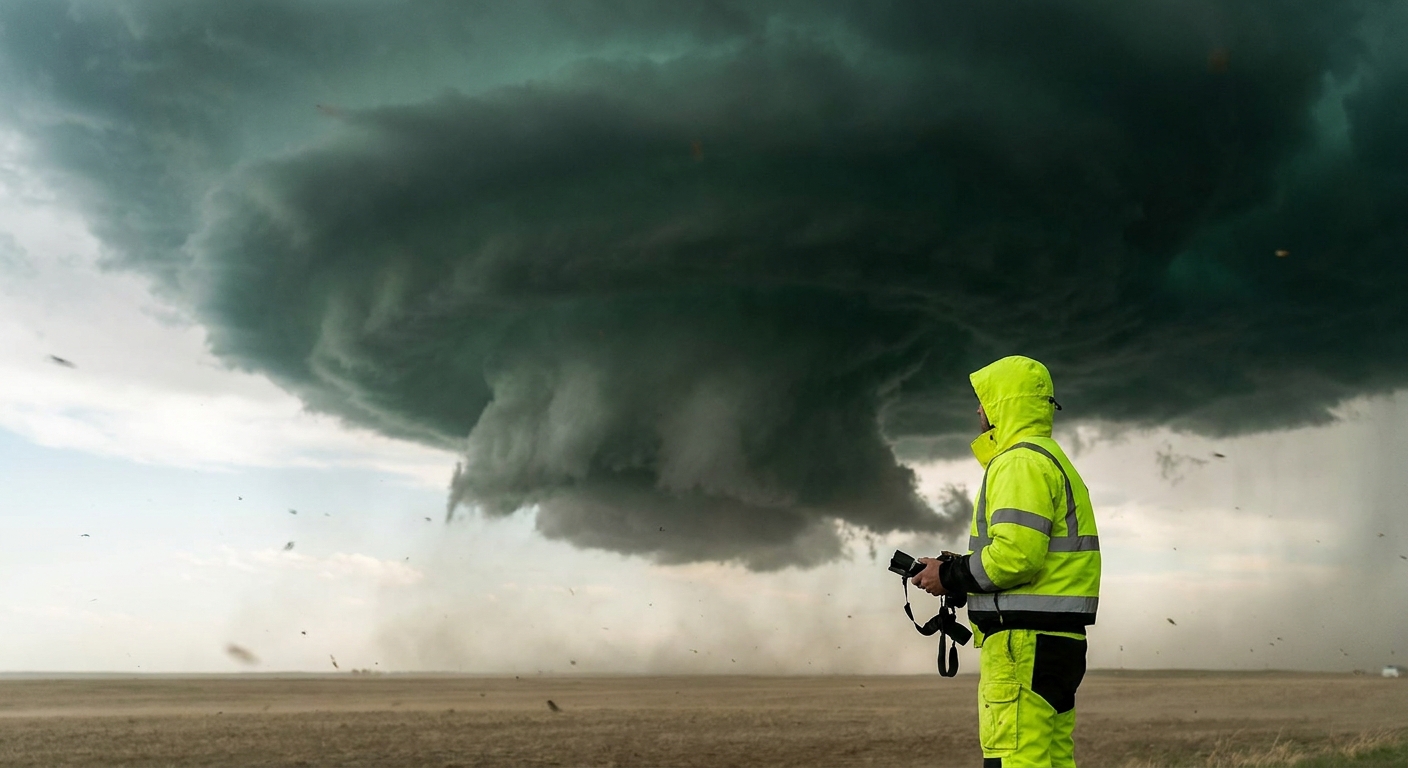
2. Personal Protective Gear
Pack:
- Waterproof jackets and boots.
- Work gloves.
- Compact first-aid kit.
If you find yourself first on-scene in a damaged town, you will be thankful you planned for this.
Step 4: Radar Workflow While Rolling
With gear in place, here’s how to use it under pressure.
1. The 3-Minute Radar Loop Habit
Every 3–5 minutes (or at each new scan):
Zoom out:
- Confirm big-picture structure—are storms congealing? Splitting? Right-turning?
Zoom to target storm:
- Check base reflectivity for hook, inflow notch, or bowing segments.
Switch to velocity:
- Identify rotation (tight couplets) or strong straight-line winds.
Overlay your GPS:
- Are you: - In front of the storm (good)? - Under the forward flank (risky visibility)? - Near the hook / RFD (only for advanced chasers)?
2. Integrating Visual Observations
Radar is not enough. Constantly compare:
- What radar implies.
- What your eyes see.
Examples:
- Radar shows strong couplet, but base is rain-wrapped and invisible: treat it as a confirmed threat anyway.
- Radar shows messy reflectivity but you see a sharp, rotating wall cloud: the storm may be transitioning toward discrete behavior.
This synthesis is how you graduate from app user to actual storm chaser.
Step 5: Camera and Documentation Gear with Discipline
Filming is alluring—but gear must support safety and science.
1. Dash Cams and Window-Mounted Cameras
Use:
- Front and rear dash cams running continuously.
- Side/window mounts for wide-field views.
These capture:
- Structure evolution for later analysis.
- Traffic and road conditions (critical after incidents).
Set them and forget them. Don’t handle cameras while driving.
2. Voice Logs and Time Stamps
As conditions change, call out:
- Time.
- Location.
- Observed features (wall cloud, funnel, hail size, wind direction).
Record this on your phone or dash cam audio. Later, you can align it with radar loops—an incredibly powerful learning tool.
Step 6: Chase-Day Scenario Walkthrough with Gear Calls
Let’s run a hypothetical first chase.
Setup: Classic dryline day in central Kansas. Moderate risk, 10% hatched tornado. Forecast favors discrete supercells transitioning toward a line.
Morning:
- You check SPC outlook, HRRR model runs, and soundings. - Gear: radar app tested, tablet mounted, helmets staged, offline maps downloaded.
Early Afternoon:
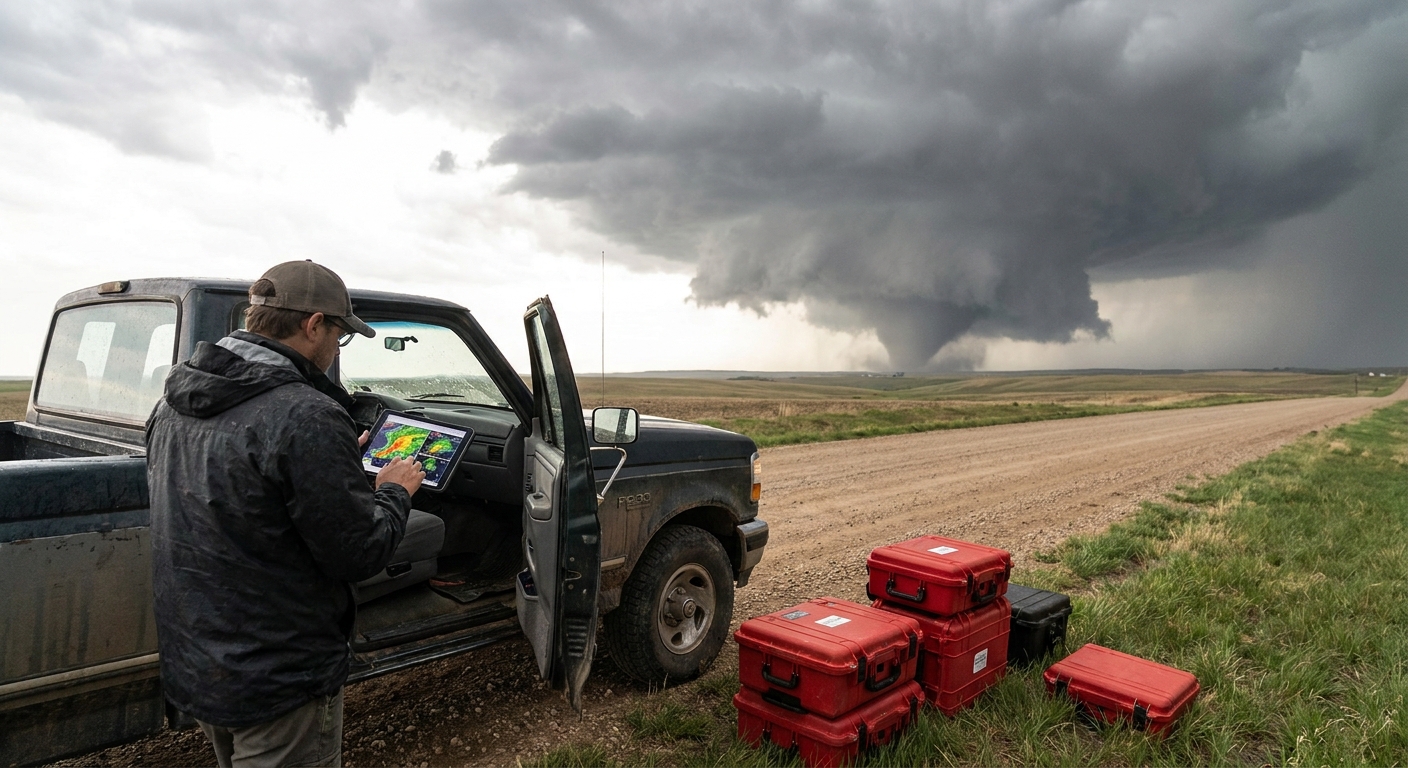
- Towers go up along the dryline. You target the southernmost storm. - Radar: reflectivity shows a developing cell; velocity still broad.
Maturation:
- The storm becomes supercellular. Hook echo appears. - Gear: you move to a road grid southeast of the storm, staying out of the forward flank core.
Tornado Warning Issued:
- Velocity tightens; you hear the EAS tone. - You stop and step out briefly in helmet and glasses to visually confirm structure while a partner monitors radar.
Decision Point:
- Radar suggests the storm is right-turning across your projected path. - You have two options: - Punch north across the notch (high risk—do not do this as a beginner). - Drop south, then re-approach from the east (safer, though you may miss peak phase).
Gear discipline says: take the safe route. Live to chase again.
Aftermath:
- A tornado forms northwest of your position; you film from a safe distance. - Later, you drive through light damage with gloves and boots on, camera rolling, offering reports to NWS via proper channels.
Throughout this scenario, your weather gear wasn’t about show. It was about information and margins.
Step 7: Post-Chase Gear Debrief
Back home or at the hotel, don’t just dump your gear in a pile.
Review:
- Did any device overheat, lose connection, or fail? Fix or replace before next chase.
- Did you have trouble accessing safety gear quickly? Reposition it.
- Compare voice logs and video with radar loops and warning issuance times.
This is how you rapidly accelerate from novice to competent chaser.
Final Checklist for First-Time Chasers
Before your next red box day, verify:
- [ ] Radar app + backup data source
- [ ] GPS with offline maps
- [ ] Helmets and eye protection for all occupants
- [ ] Seatbelt cutter, window punch, fire extinguisher
- [ ] Paper maps for key states
- [ ] Waterproof clothing and boots
- [ ] Dash cams set and tested
- [ ] Power banks and cables
The storms will handle the drama—towering anvils, barber-pole updrafts, inflow winds singing through fence wires. Your weather gear’s job is to make sure you can stand in the middle of it, alert and alive, long enough to truly learn from what you’re seeing.
Step into your first chase not as a spectator with a smartphone, but as a prepared observer of severe weather. The difference is gear—and the discipline to use it.